Wednesday, February 24, 2016

Good day

                                           Good day!


I have my Etsy shop open again, and some have found me there, and some customers have not yet realized my shop it open. It was down for a few months, where I sold on Artfire, but now I'm back to Etsy, and it feels so good!


I have been busy making tag sets and I'd like to show you one that I made recently. It is super fun to do, I watched a tutorial on youtube and the lady inspired me to create some of my own! I haven't gone back there since and I don't remember the address or anything, so I can't share. Next time I'll remember to write those things down to share with you.

So, I made my own tag using double sided cardstock. fold it at the bottom, how ever large you want you pocket to be, stick the flap to the original side, make sure your adhesive only glues together the outside edges because we need a pocket for the journaling tag. After that I cut a tag from the flip side of the paper I was using, set it in the pocket to make sure it fits, you can punch a hole at the top if you like and start decorating there, this tag and holder I have punched the hole at the top of the holder and put tons of ribbons up there (as many as fit in the hole at the time). 

Then is the favorite part! You get to decorate your tag! I used stick on lace ribbon, washi tape, a flower I had left over from another project and some pretty buttons. I also used some green ribbon, which is half organza and half satin, with a pretty filament in the middle. I also used some of my vintage wrinkled ribbon at the top, which I think go great with the wrinkly flower I chose!

I hope everyone has a great day!

Comments are welcome!

Talk to you soon! 

Wednesday, January 6, 2016

I'm Back!!

Hi there!

I know it has been awhile since I have added any content to this blog, going to try and change that. You know how it is when you stop for a few days, put on the to-do list and then family, children take us away from all of crafting, blogging etc. Well, my kids are a bit older now, and I'd like to start blogging again and we'll see how it goes! :)

For the first post in a long time I'd like to feature an item from my artfire shop.

Prima Paper Flowers Pink and Blue Assortment No.305 Got Flowers


Hope everyone has a nice Wednesday! Thank you for stopping by!

Monday, January 27, 2014

A Crafter's Life by Thirdeardear: TREASURY MONDAYS: The Freeze is on!

I have been chosen by the awesome Mary Ann as a feature for her Treasury Mondays and I'm very grateful as out of all of Etsy she picked one of my items today, Thank you Mary (Mama).

A Crafter's Life by Thirdeardear: TREASURY MONDAYS: The Freeze is on!

Above is the link to see the other "cool" items she chose and the Freeze is on is definitely for me up here in the U.P. School was cancelled and everything!

I hope to start blogging again soon with projects and games, and fun things for readers!

Hope to see you soon!
Thanks again Mary Ann!

Jessica

Friday, November 15, 2013

A Crafter's Life by Thirdeardear: TOP SCRAPBOOKERS (.....or scrapbooking suppliers)

A Crafter's Life by Thirdeardear: TOP SCRAPBOOKERS (.....or scrapbooking suppliers)

I'm featured in a top scrapbooking shop at the above blog and link :)
So nice of Thirdeardear to include my store in her top opinion. You can go there and vote for who you think is the best :)

Pick me, pick me, pick me! :D
Just kidding! ;)

Monday, August 13, 2012

May Arts Silk Ribbon Challenge for August!


Here I have a pretty (I think) hair accessory that I created for the May Arts Ribbon Silk Indulgence Challenge this month. I was sent a yard or two of each ribbon (wide cream, and thin ribbons of pink, purple and white) and needed to make a project! It was fun, the ribbon is thin and silky, has some natural pretty sheen and texture to it, so here are some photos! : )
may arts silk ribbon challenge lfth 2

So! I took the wide ribbon and made a base flower, added my net tulle “petals”, and also some vintage lace “petals”. I took the two thinner pink and purple ribbons and held them as one and crocheted them together to form the middle of a flower, took the white ribbon and crocheted around that, then a darning needle to make the loops around the edge of that! That’s the middle of this piece. I found a pretty pearl and silver filigree type button that I thought was great! I added some white feathers to match to white in the ribbon. Sort of really wanted cream feathers… but didn’t have any that were fluffy enough for what I wanted. : )
may arts silk ribbon challenge lfth 1

HAD to take a few (lol, more like 20 to get it right, finally hubby took this one to get the right angle to show off the accessory! Thanks, hun!!) Here is a photo of me wearing the piece in my hair, sans makeup today… sigh! it’s one of those things a girl should Always have an extra set of at home, just in case said girl should forget the makeup at say… a relative’s home… (far far away) lol
But anyway!!… The whole piece measures approximately 6” (counting feathers) and 4” wide. I had fun, it was my first attempt at making flowers with ribbons, and I’m pretty proud of it, in all honesty! Yay I did it!! I think (having a challenge really gets me to just “do it”) I’ll make more I hope to get better too!
Let me know what you think, I’m happy to hear from you!

Thursday, June 28, 2012

A handmade present from a friend!

I just have to share this with everyone! My best friend in the whole wide world, is completely addicted to my Sweet and Shabby flowers. Smile (Great minds think alike!) So… Anyway…(the sweet, generous person that she is) she hand-made a gift for me out of the flowers she ordered from me! I received an amazing package in the mail the other day! I was seriously teary eyed over it! Here is part of what I received:

Arna's Bear 2

Yup! Is that a great friend or what? Isn’t this the cutest little bear ever!? She has hand made the skirt/stand for the bear, then hand made the dress. She stamped the sentiment “I’m so glad you’re my friend” on cardstock and made a sign with it (extra bling included!) added some sweet pearl necklaces and added one of my paper flowers to the top. (Like a great hair accessory or a vintage hat!)

Here’s another look: Arna's Bear 1

The back is this great satin bow! The sign on the back says “Shalom” (more bling included!), and how the bear is holding the sign, I can just twist it around in her hand without even taking it out in order to change the sentiment facing me!

I (and her whole family) think she should make these to sell in her handmade shop! I will post the link for sure when she gets them listed! For now, her shop is ShalomEverlasting and she has some great cards and vintage items there!

Last look!!  Showing off my flower and her great use of them on a project outside of scrapbooking and card making!

Arna's Bear 3

Love it! and love you too, Arna! Thank you for letting me post this for the whole world to see! I hope that everyone reading this has a wonderful day! Thank you for stopping by!

Monday, December 19, 2011

GIU Week Stamp Set Winner!


So I counted up all of the so sweet comments from everyone (thank you again!) and then entered the total number in random.org and had a number picked… counted out the comments and the winner of the drawing for the set of Unity Stamps is ……


Fabulous card! Great dimension using those elements!


Congratulations!!!

Please email me with your choice of stamp set and your mailing address!

Have a happy day everyone, I will see you soon!

Hugs,

Jes

Sunday, December 18, 2011

Growing in Unity Week! Day 7


Last project for my Growing in Unity Week. This project is a thank you card for all of you and for Unity Stamp Co. for letting me participate. I hope that my projects showed just how great and versatile the stamps are!
unity stamp sunday project


For this project I used my favorite color pink on many elements! I started with paper from Basic Grey’s Hopscotch Line. Other textured cardstock used was from DCWV.


The stamps I used on this card are from Unity’s September KOM and November KOM.
The sentiment is stamped in pink, the corner is stamped in a redder pink on pink textured cardstock. The clocks are stamped in a silk green on pink polka dotted paper, then layered on additional cardstock circles.


The lace is a vintage from my stash, the pearls are Prima and the rose is Prima too! The flourishes are punched from cardstock and inked, as usual there is lots of foam adhesive and glue dots, inking on edges for aging and dimension.


There is no madness or words of wisdom for today. I just wanted to say, “Thank you!” for taking time out of your day to stop by my blog. It means a lot to me. The kind comments really helped me continue creating for the blog, and I know there are some great people out there who have not been able to comment because of technical difficulties… like my best friend, Arna. (I hope we can figure out why you are not able to comment hun!)


Even though my official posting for the GIU week is over, I am so happy to announce that I will be posting regularly from here on out. I’m back in the blog world, feels great and since I’m all about finding happiness and embracing creativity, here we go!


Thank you again, it was so nice to meet all of you!
Blessings,
Jes


P.S.
Drawing the winner of the stamp set tomorrow morning… the minute I get the kids off to school! : )

Saturday, December 17, 2011

Growing in Unity Week! Day 6


Good evening! For my 6th Growing in Unity Project, I made a traditional type Christmas Card. 

Unity stamp saturday project

1. For the base I used cream colored cardstock (from an unknown source, admittedly… hee hee) and added the awesome Basic Grey patterned paper. 


2. I used a velvety ribbon in burgundy to make a “gift” look to the card. 


3. For the sentiment and the tree, I used stamps from Unity Stamp Company’s September 2011 kit of the month. I think the designs match the Nordic background paper so well! I know I have covered up much of it with ribbon, flowers and such, but I know it’s there, I know it matches, so… I’m super happy with that. : ) 


4. I used Dew Drop ink in a metallic gold for the tree, and a green color of cat’s eye ink for the sentiment. I chalked the gift tag in a shimmery brown and inked the edges of the tree cardstock in the same gold as it was stamped. 


5. The flowers are Prima the bottom one I actually tore apart one of my budding roses and splayed out the petals and added a bow. 


6. There is also a little stamped edge accent on the side of the main image card with is brown with gold inking. 


7. Adhere parts of card together with foam adhesive and glue dots… and BAM! Christmas Card!

“Method to Madness” today is that I had to use some serious artificial light to get the shimmer ink on the tree to show up in a photo. The fine glitter in the ink, shows up to the naked eye differently depending on which direction you are looking at it. Sometimes it appears very light and hardly there, and sometimes it looks like, “wow!”. 


I find this perfect for my sentiment of “The Gift of Christmas” because with this card you might not see the main image unless you look at it a bit differently – it doesn’t stick out like a sore thumb in real life. So also, are many of the best gifts of Christmas not the ones with the shiny gold bows on them or all the yummy food. It may take looking at the season’s events and people who surround you in a different way than traditional, but once you find the hidden gift, that special something you may not have noticed before… it will be SO worth it! 

I have already had so many gifts this holiday season and they may not have meant a thing to anyone else, looking from outside of me, but I see them, I am enjoying them, and I am so thankful for them. One awesome gift this holiday season is all the super people I am meeting by participating in Growing in Unity week!


My hope for you today is that you receive (and see) some real Gifts of Christmas!


Thank you so much for stopping by and reading my blog!

Friday, December 16, 2011

Growing in Unity Week! Day 5


Today I have a tag that I made using Unity Stamps! Reminder there will be a drawing held on Monday from all of the comments during this week on Growing in Unity Posts – Monday through Sunday this week. On Monday morning, I will have random.org pick a winner for a free stamp set from Unity Stamp Co.! It will be their choice of one of the following:

Sending My Love
Bitty Backgrounds
Little Me
Bella Fiori
Homegrown
Hugs & Kittens
Handmade Holiday
Bella Trees
Imagine It
unity stamp friday

For this tag I started with a pre cut tag from Basic Grey, and cut it a bit shorter. I stamped these flowers and the rocking chair from Unity’s July 2011 Kit of the Month. 

 The flowers, I stamped and then colored and cut out, adhered to the card and then stamped, colored and cut out extra buttons from the same flower stamps. Then put them together with adhesive foam and put on the tag.  


The lace is a great off white and I think helps with the feel of the tag and the ribbon is a vintage pink ribbon. 

 For the middle I stamped the rocking chair on cardstock and then folded the top over (square like a matchbook), of course using my fav chalk to age the edges of the “matchbook” and edges of the tag too. 

 I think it would look great on a baby girl page, I wish I had time today to make a baby girl page for you, but as it was… my original planned project, sunk into the dark depths of the scrap box, and my second attempt did so as well. I persisted and kept trying and here is the result. I suppose, I could have used different stamps, or chose something else to showcase today that may have been easier… but I had stamped these flowers and really wanted to use them on a project today. I feel great about keeping with it until something worked! : ) 

 So, today… as with every other day… my hope for you is that you do not give up. Take a deep breath, and maybe a chocolate chip cookie break, and try one more time. You can do it! 

 Thank you for stopping by! 

 Scrap box: noun – the bin in our home that I keep scraps and misfit items that the boys (and I) are allowed to repurpose for projects at their (or my) free will. So hard to throw things away! Reduce, reuse, recycle!! :D

Thursday, December 15, 2011

Growing in Unity Week! Day 4

Good morning! Today I have a snowman card featuring Unity Stamps!

unity stamp thursday 1

The snowman stamp is from the November Kit of the Month and the sentiment, “a smile is the beginning of peace – Mother Teresa” is another stamp I am not sure the name of the kit it is from.

1. To make this card, I started with American Crafts Cardstock in a pretty purple cut to size and then folded for the card base.
2.  I stamped the snowman with black Staz On ink and then attempted to color with my small collection of Copics added glitter “snow” to the snow piles at the bottom of the image and let dry. Then cut out the stamped image and matted with a pretty patterned paper.


3. I added the ribbon to the card, then added the snowman on mat.


4. Stamped the sentiment on patterned paper, and distressed the top edge.

5. Took my Prima SIIC flourish and cut it apart and added it to where I wanted it on the card.

6. Then I cut the stems off of the Prima miniature roses and glued them to the card. Then I played with the petals a bit to make a few of the roses a bit fuller than they were to start with. It’s great that these are so easy to manage, if you want a full flower, or a smaller flower..the paper with let you mess with it by squeezing the sides in for a smaller flower or gently pulling the petals down for a fuller look.

Thank you so much for stopping by today! I appreciate your comments :)
Today I hope that you find a moment to just smile, maybe for no good reason at all other than in about 5 seconds after starting to smile, you start to feel all the good vibes that come with happiness, and maybe someone who sees you will start to feel like smiling too!

Wednesday, December 14, 2011

Growing in Unity Week! Day 3

Project number 3 already! : ) Today, I have a card to share with you made with Unity Stamp Co. stamps, and I have to say…I really like this one. I think I may just put it on my own card wall for keeps.

unity stamp wednesday project 1

Now there is always a method to my madness here at Layouts from the Heart and with this card, I purposely chose muted colors to signify and represent the “quiet” the sentiment speaks of.

The stamped “flower” with the sentiment on it is really two different stamps from Unity, and I do not know which collection they are from because I used just a grab bag set I had purchased from them for this project. But I used cat’s eye ink pads for the outer muted teal color, and then I used Brilliance ink for the sentiment. The stamped butterfly is in a pink color and then stamped with a pink red and hand cut out so I could bend the wings over the rose flower as if it were landing on the flower.

I chose the butterfly with the music notes to represent all the beautiful things we can hear if we are to be quiet enough to listen… to really listen. I know it is hard most days with all of the crazy things in life we have to do, places we have to go, demands put upon us by ourselves or others, but if somehow we could carve out a few moments of the rush to quiet ourselves, maybe something beautiful will pop out at us just as much as the butterfly pops out of this card! Obvious that it is there, right? But had I chose louder colors that competed with the butterfly it might not have been so visible. : ) That’s the thought behind it anyway.

As far as supplies go, the flower is from Prima and is from the Treasure Rae Georgia set and the papers are from DCWV, the ribbon is a satin edged organza, the stamps are (of course) from Unity.

Thank you again for stopping by!
I hope that today, you hear or see something special and meaningful when you take the time to have a quiet moment!
unity stamp wednesday project 2

Tuesday, December 13, 2011

Growing In Unity Week! Day 2

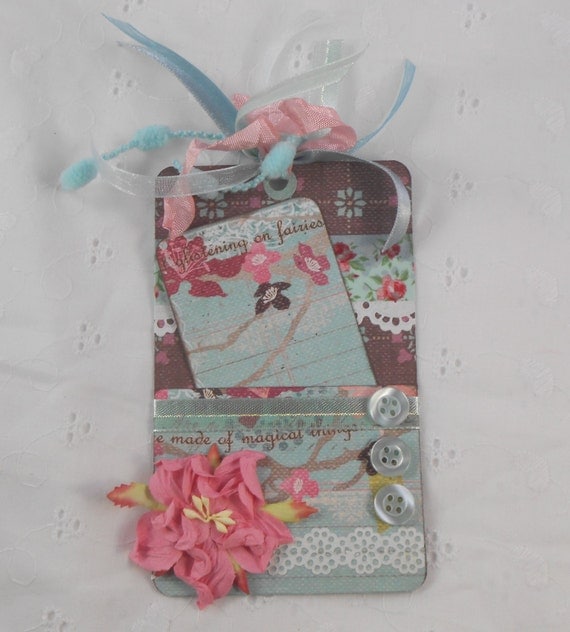
Today, for my Growing in Unity Day 2 project, I have a set of small and simple tags that I made with a love theme – great for Valentine’s Day coming up or any day coming up, as I just love hearts and the love themed stuff!

unity stamp tuesday project 1

Here’s how I did it:

1. I stamped the images on different shades of pink cardstock tags and chalked the edges with Pebbles Inc. Pearlescent chalks (I seem to reach for those frequently!).


2. The rubber stamps I used were from Unity Stamp Company – Samantha Walker, With all My Heart kit, I really like the quality of images they produce! The set contains 20 different images, I chose the smaller ones for these tags. The one tag on the far left is a border stamp and also one little flourished heart stamped twice.


3. For the ink I used Dew Drop Brilliance ink (because I like the slight shimmer to it and fast drying time)


4. Lastly I punched a hole in the top and tied with some cotton twine.


The tags measure about 2.25” long and 1.5” wide. A great way to dress up little gifts as the back side is blank, or to add to a larger project :)


Thank you again for stopping by today! I hope you feel joy and satisfaction in everything you do today!

Jessica

Monday, December 12, 2011

Growing In Unity Week! Day 1

Today is the first of many projects that will be posted featuring Unity Stamp Co.’s wonderful stamps! This week is special because there will be a Giveaway!!! From all of the comments on my Growing in Unity posts at the end of the week I will randomly pick one winner and that randomly picked winner has a choice of one Unity Stamp Co. kit from the following list:

Sending My Love

Bitty Backgrounds

Little Me

Bella Fiori

Homegrown

Hugs & Kittens

Handmade Holiday

Bella Trees

Imagine It


Yay!!! So here is project number one! jessica preaseau happy accident card 1

A simple card with a simple, yet not so simple sentiment. “Smile and forget Everything” is great advice for anyone! At least for a short amount of time, if we an somehow not worry, and just smile, things will seem so much more livable and enjoyable. I love this sentiment and the shabby way my inking smeared! I just smiled and thought it added to the distressing of the main embellishment :) The cardstock is DCWV, the Stamped edges of the layered sentiment was cut from my Silhouette, and the ribbons on the bottom are all May Arts. I used ribbon to make the flower accent and cut a butterfly from another ribbon to use as a center.


It was amazing the experience of being able to participate in the Growing In Unity program. I already have learned so much about myself and my crafting, from the email last week saying that this was my week, to today (and I’m sure beyond today) I have grown as a crafter and a person. I have grown as a crafter, because of the challenge of coming up with 7 projects to share with the world, in a week and also because of the challenge of not having any limitations on these projects. I’m so indecisive, looking through crates of papers, sets and sets of Unity stamps, the variety of inks, searching for inspiration from my supplies was something else! lol, I found out about myself that I have grown used to being given directions for projects… i.e. “I need a baby boy page, I need a wedding page with this color and that color in a modern style, or say… a birthday card needs to be made for an aunt, and I know the aunt likes purple and angels. Then I whip up the project with the “qualifications” and I’m happy with it! However, when left to my own devices, my own infinite choices… I tended to become paralyzed with the options, and felt that I would talk myself out of most ideas that I had! How silly is that?! I hope that I have made progress in getting over that, it may be a long road ahead of me to totally squash the voice inside me that says, “nope..that’s too boring, nope…that’s been done before, nope…those are obvious color choices, everyone uses that sentiment with that picture, etc, etc.” I am explaining all of this because I hope I’m not the only one out there and maybe we can find strength together in the fact that creating anything with such wonderful supplies as are available to us, whether they be similar or not to anyone else’s projects, is really an accomplishment in itself. A piece of my heart and time goes into every project, I do my best, and well… maybe it will inspire someone else out there… and that would make me smile!


Thank you so much for stopping by today!

Blessings and have a joyful, creative day!

Wednesday, May 18, 2011

Sunday, May 15, 2011

Thank you to Sweet Nothings Paper Company

A new customer of mine who recently ordered has shown me a wonderful new view of my shop! I cannot thank her enough for the surprise I found one day in my Etsy Conversations. She had posted me a link to a youtube video of a critique of my shop. I must say that I thought it very insightful and a neat way to see how my packages make it to their destinations and how customers feel when they open the packages and receive their items.

I'm going to reshare this for everyone to view if they wish. :) You can find the video HERE


Thank you SO much Sweet Nothings Paper Company, you have given me a great gift, since really... this would be the only way I could see how things turn out on the other end of mailing! I'm very happy, and hope that someday I can do her a favor as well.

You can also find Sweet Nothings Paper Company on Etsy too HERE

I hope everyone had a lovely weekend!

Wednesday, April 13, 2011

A sweet mother's day card

Here is a card that was so fun to make! I hope the recipient will like it just as much! :)

Saturday, March 12, 2011

March: Prima Product Pick and Palette

After a long winter, March often brings us renewed hope for spring! It is also filled with lots of fun celebrations including St. Patrick's Day. In celebration of St. Patrick's Day we are bringing you some of our very best, very GREEN products and projects!


march 2011 picks

Prima's Product Picks for March are filled with lots of lucky leprechaun greens! We never knew green could look so GOOD! Just look at these gorgeous NEW products:

  • Butterflies
  • Arco Iris Flowers
  • Deshire Flowers
  • Lovely Leaves
  • Delightful Day Flowers
  • Raffia Flowers
  • Champagne Roses
  • Crystal and Lace borders
  • Trinkets
  • Cabachon Flowers
  • Lace
  • and DeSoie Flowers
  • (This is reposted from Prima's blog)
Which is YOUR favorite? Mine is the Crystal and Lace borders! Yummy….

Friday, March 11, 2011

New Release Prima Clear Stamp Sets

544959 2
This is one of the fabulous Madeline Clear stamps featuring a bird with a crown, a key, butterflies and more!
You can find this set and several others HERE in my shop! I have had great reviews from customers on the quality of the impressions that these little stamp sets make! I agree, it’s amazing the quality of such little stamps.

Tuesday, February 15, 2011

A Sweet Card for a Sweet Mom!

card with chipboard butterfly 3

Here is a card that I made with some Prima Flowers layered and added some sweet green gems from the Sage Pearls and Crystals from their e-line. I used some stamps to add the sentiment and flower flourish, I’m sorry I don’t remember what company the stamps are from! :) Cardstock from Basic Grey and then some organza ribbon on the side… My mom was happy to receive it, I think I was happier to give it!!!


The butterfly started as bare chipboard from a friend of mine on Etsy, and I added the paper from Basic Grey and then painted the metallic silver body and antennae and added another pearl from Prima’s e-line pearls and crystals. I have a variety of these in the shop and also some on Etsy.


Thank you for stopping by, Happy SPRING!!!

Tuesday, October 26, 2010

Just in Time Fall Layout

With the month of October coming to a close, it feels like this layout with fall colors was finished “just in time”. Although, just because the colors remind me of autumn doesn’t limit the different themes this page could be used for. I used many different flowers, a butterfly and a bird as complements to the photograph that will be put on the mat.


fall layout 1


I used mostly Prima flowers from my stash, but also some pretty silk flowers that my friend had given me too. Of the Prima flowers I was able to incorporate many different lines including the Impressions Dots, the Chelsea embossed flowers in Plum and some super cute white layered Artist Aids flowers.


I love how the real lace turned out and the chipboard bird too.

What does everyone else think? I’m open to suggestions! :D


If you would like to see more photos of this layout you can find it in my Etsy shop HERE.

Thank you so much for stopping by! Have a super creative week!

Friday, October 8, 2010

A little Halloween page to share

halloween spider 2

Here I made up a Halloween themed 12 x 12 Scrapbook page. I used some cute background paper… do you see the little ghosts? :D Otherwise there is a lot of spider webs and Prima flowers. You can see more of this layout HERE.

The candy corns glitter, the light green gems in the title set off the green flowers and green here and there. Main colors include purple, orange and black. Whimsical spiders (not too scary) as accents on torn mats. Well, paper flowers are not too scary either, but I just have to have them on everything, you know how I feel, right?

The orange patterned buttons are really fun to make up! They start out as bare chipboard and I covered them with paper from my stash of Basic Grey Ambrosia, sanded the edges then inked them, and I was ready to add my bakers twine and glue to the layout! Really fun and easy!

I bought these bare chipboard buttons from the shop SpectacularStuff on Etsy. She hand die cuts all of her chipboard shapes, and is so nice to work with on custom orders! Let’s just say… she is very sweet, and fast with cutting all the different shapes and shipping. The quality is perfect on these shapes! Is there not a better way to help your creativity than to start with quality supplies? I just want one of everything in her shop! :) I'm almost there... hee hee.

Thank you for stopping by! Have a joyful, creative day!

Saturday, April 24, 2010

A Baby Boy page for a special friend!

Here is one lonely photo of a page that I made for a friend’s new baby. I absolutely loved how the little elephants turned out. What do you think? :) The title is all glittered and the photo mat also has glitter stripes going through it. I add shimmer all over the place… cause I like sparkle. The paper is embossed with dots for a nice raised effect. On this layout I left space for her to write in her own sentiments, or put the baby’s bracelet or another memento on the left of the page. The 5x7 photo mat has 4 layers, all inked and the top layers are stitched. We have some pretty flowers and flourishes, and some shiny brads to top it off. 


Photo turned out somewhat dark… apologies. :)


DSCN3693

Last year’s July 4th layouts!

Wow, I’m trying to update things and well, I guess I’m going to start with the older layouts first! :) I should have taken photos of them all, but bear with me as I search for photos of more work I’ve done, and bring in some newer scrapbook pages soon!


Glittered flowers, hand paper pieced airplane, banner with rhinestone flag, layered shiny stars, hand drawn fireworks and sparkler. Acrylic frame with wire charm and hanger. The mats are all stitched around the edges and the flag mat was pieced as well. My little bear is wearing his cutest matching 4th of July outfit (hand drawn and pieced as well) Even the stars were cut by hand! This one took a lot of work, but I think it turned out nice. I hope you can zoom in on the photos.


DSCN2729

DSCN2723 DSCN2717

Sunday, November 22, 2009

New Prima Flowers in My Etsy Shop

DSCN3435

I am soooo super excited! I have Prima Flowers and Stamps in My NEW ETSY SHOP ! Come and stop by if you want to, let me know what you think…


I will be getting some crafting done soon—promise!


Have a wonderful day!

Monday, September 7, 2009

Summer Surfing Bear Layout

DSCN3132


Here is a layout that I listed on Ebay today, it took forever to finish, because I wanted everything just right...it's a theme with me it seems! The pages do fit together perfectly, even though, I had to take the pics on my couch so I could get the best lighting. The softness of the cushions did not let the pages lay perfect, but I assure you—they do fit together with no gaps and the waves and sands from the beach are exactly even with each other when put side by side!

I received a lot of encouragement from my friends in order to complete this so I want to publically thank them for their support!

I am so happy with the way it turned out though, so I'm sharing it with you, so you can let me know what you think. I'm always open to constructive criticism, that's how we grow. Or maybe you'll be inspired to create something new too!

Check out all of the photos for this layout on the Ebay listing here!

My first SMIC layout sold on ebay

Ebay 007

Here is a blast from the past!!!!

My first layout I ever sold on ebay! Love the font on the watermark? It’s called Crazy Girlz Blonde!!! LOL!

Sorry about the pics

I just am having a hard time gettin my pictures to turn out once I post them...so sorry!

Thursday, September 3, 2009

May SMIC Challenge

Photobucket
Here is a 2 page 12 x 12 layout that I created for the SMIC May Challenge. The challenge was "In Memory of" or "Memories". This is my favorite layout that I have sold so far, as it turned out just perfect. There many pearlescent papers, and I made a woven heart to hold 3 double-sided journaling cards. Lots of different accents that popped off the page and it really portrayed the feelings I was going for on this layout.


I had more pics of this layout to share, but I just cannot figure out why they are not turning out on the blog. When I'm editing the post, it looks perfect--when I publish it the photos are all distorted and bigger than what I wanted. So, I'll work on that, please excuse me, since I'm rather new to blogging! :)
I'm sorry I don't have a recipe for you, I have such a hard time keeping track of the things I use...I know there were prima flowers, and DCWV papers, and the main set of papers was from a different company. Vellum, ribbons, brads, chipboard, shimmer chalk, ink and eyelets were also used. Now that I'm getting in the habit of blogging, I'll try to be more careful to write down recipes, deal?

              Thanks for stopping by!

Friday, August 14, 2009

Welcome!

Welcome to my new blog! Thank you for stopping by!

I have a passion for papercrafting and this is another way to connect with other like minded people for extra inspiration and fun! I hope that you will find yourself visiting for information and sharing as well!

I belong to a wonderful small group of ladies called SMIC (Scrap Memories in Couture) who have joined together to support each other in selling our papercrafts on Ebay. So, if you are in the market for pre-made scrapbooking layouts you can search our listings on Ebay by typing in SMIC.

I will be listing a 2 page, 12 x 12 scrapbook layout soon, and will post pictures and a link here to share!

My scrapbook layouts are made with joy, from the heart, and in the hopes that our memories will be kept beautiful and fresh in our books, as well as in our hearts.